Which Rapid Prototyping Method Is Right for Your Product?
Rapid prototyping is the process of turning a CAD file into a physical part within days, mostly through 3D printing and CNC machining, so you can test form, fit, and function before you commit to expensive production tooling. It lets a product team hold, measure, and stress a design instead of arguing about it on a screen. That single loop, design, build, test, and revise, is what separates products that ship on schedule from products that stall in engineering. It is the muscle behind our rapid prototyping service.
This guide explains what rapid prototyping actually is, the five methods you will choose between, what each one costs and how fast it runs, and how to bridge from a working prototype into full production. It is written for founders, hardware engineers, and product managers who need real parts in hand this week, not next quarter.
Method picker
Which prototyping method fits the job?
Match your priority to the right method:
What Is Rapid Prototyping?
Rapid prototyping is a group of fabrication techniques that build a physical part directly from a 3D CAD file, fast enough to support quick design iterations. The two dominant families are additive processes, where a machine builds the part layer by layer, and subtractive processes, where a machine cuts the part out of a solid block. Both start from the same digital model and both aim at the same goal: get a real object into your hands so you can validate it.
The point is not to make the final production part. The point is to answer questions. Does the housing actually close over the board? Is the grip comfortable? Does the bracket survive a drop? A prototype turns those questions into evidence. Because each build is cheap and quick relative to cutting steel tooling, you can run several versions, learn from each, and arrive at a production ready design with far less risk. This is why rapid prototyping now sits at the front of almost every hardware program we help source and build.
The Main Rapid Prototyping Methods
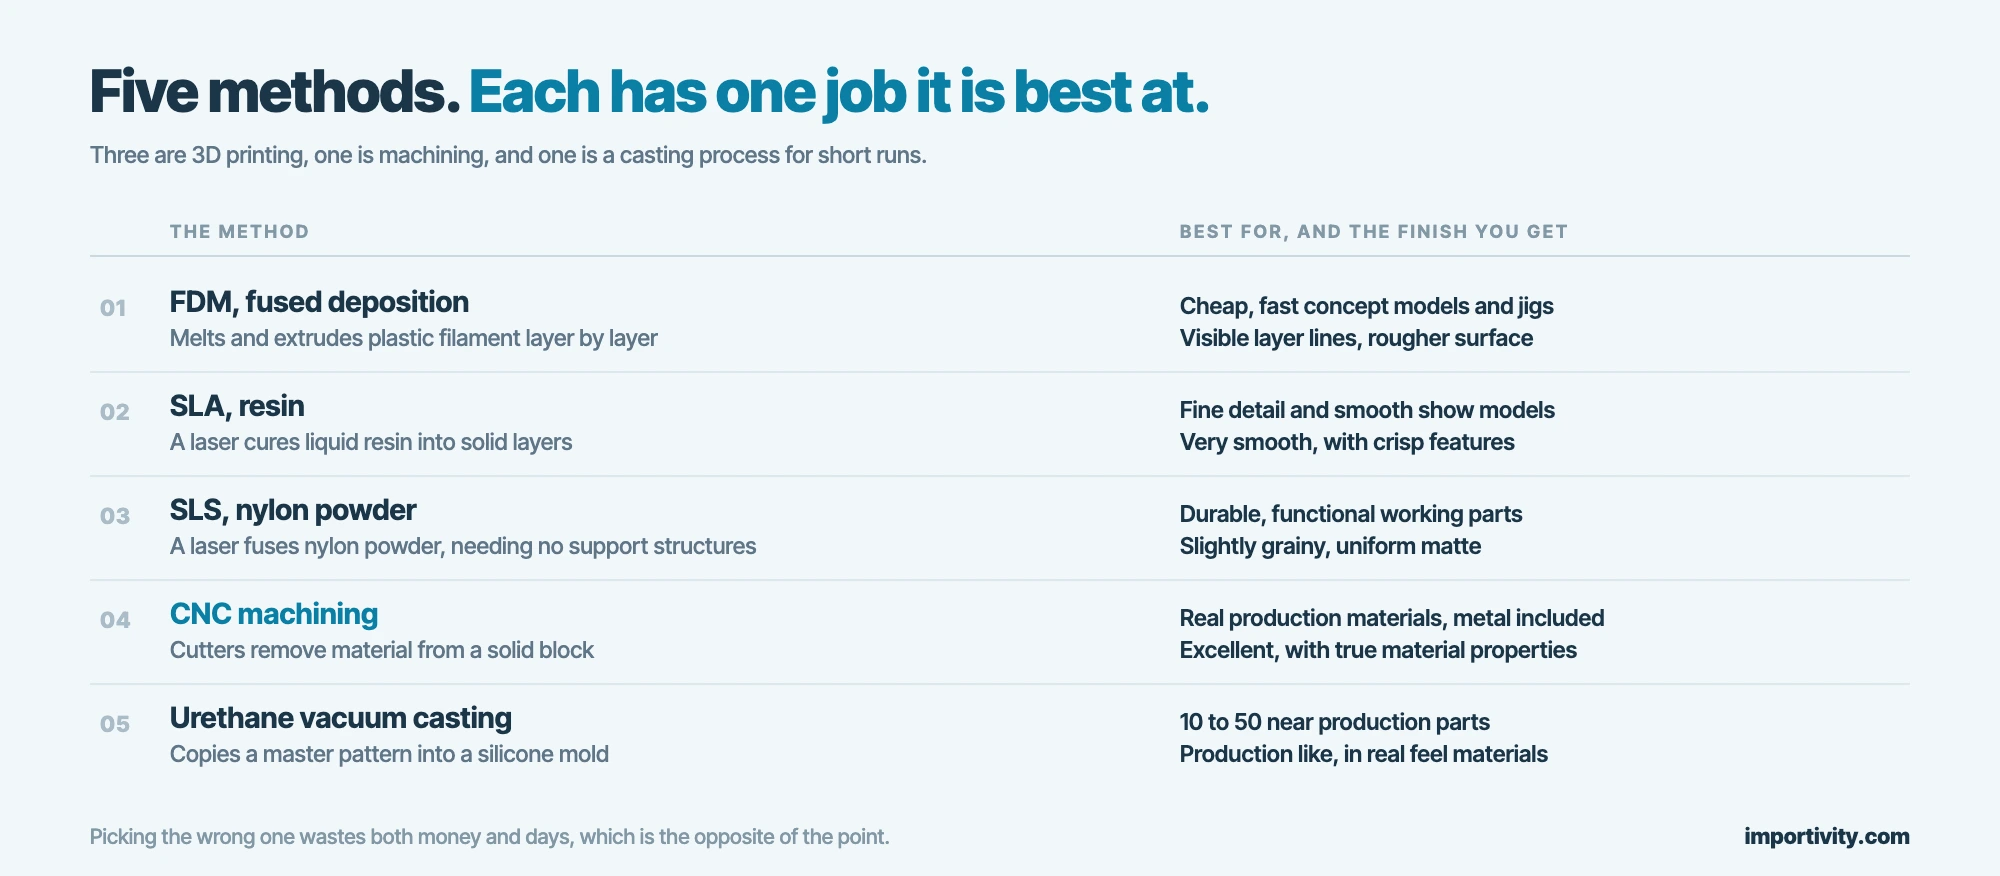
Five methods cover the vast majority of prototyping work. Three are 3D printing processes, one is machining, and one is a casting process for short runs. Each has a clear sweet spot, and picking the wrong one wastes both money and days. The table below lays out how each method works, what it is best for, the finish you should expect, and its relative cost.
| Method | How it works | Best for | Finish | Relative cost |
|---|---|---|---|---|
| FDM (fused deposition) | Melts and extrudes plastic filament layer by layer | Cheap, fast concept models and jigs | Visible layer lines, rougher | Lowest |
| SLA (resin) | A laser cures liquid resin into solid layers | Fine detail, smooth show models | Very smooth, crisp features | Low to medium |
| SLS (nylon powder) | A laser fuses nylon powder, no support structures needed | Durable, functional working parts | Slightly grainy, uniform matte | Medium |
| CNC machining | Cutters remove material from a solid block | Real production materials, including metal | Excellent, true material properties | Medium to high |
| Urethane (vacuum) casting | Copies a master pattern into a silicone mold | 10 to 50 near production parts | Production like, real feel materials | High per program, low per part at volume |
FDM is the workhorse: cheapest and fastest, with rougher layer lines that are fine for internal checks. SLA gives you fine detail and smooth surfaces for parts people will actually see. SLS makes tough functional parts and needs no support structures, so it handles complex geometry cleanly. CNC machining cuts real production materials, including metals, and delivers the truest properties. Urethane casting copies a single master pattern to produce short runs in materials that feel close to the finished product.
Costs and Lead Times
Speed and cost track closely with the method. 3D printed parts often ship in one to three days, CNC machined parts in three to seven days, and cast parts in one to two weeks. The chart below shows typical single part lead times so you can plan a design loop realistically. Remember that these are turnaround estimates for a straightforward part, and complexity, quantity, and finishing all push the numbers up.
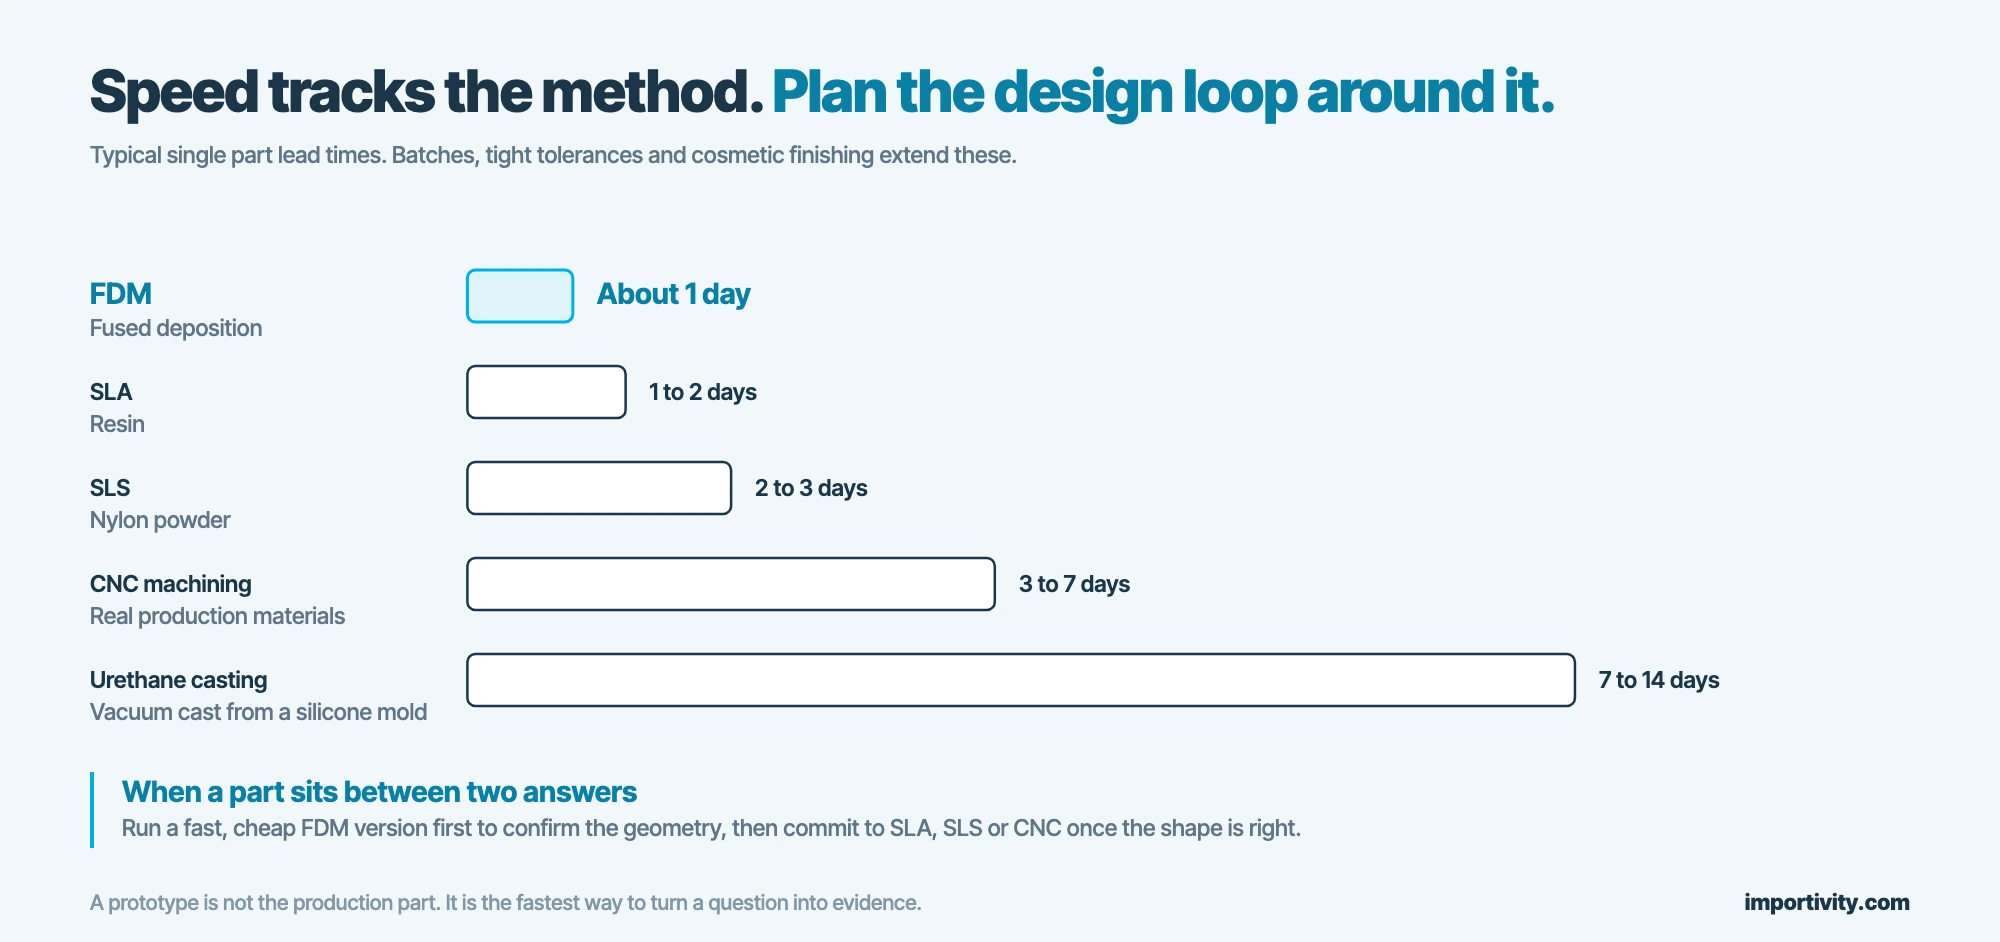
Typical single part lead times. Batch quantities, tight tolerances, and cosmetic finishing extend these ranges.
On cost, the pattern is just as clear. A single FDM concept part can run from a few dollars to a few tens of dollars. SLA and SLS parts commonly land in the tens to low hundreds, depending on size and material. A CNC machined prototype in aluminum or steel often runs from roughly one hundred to several hundred dollars per part because of setup, programming, and material removal time. Urethane casting carries a higher upfront cost to build the master and the silicone mold, usually a few hundred to a couple of thousand dollars, but the per part cost then drops sharply across a run of 10 to 50 units. That economics is exactly why casting only makes sense once you need a batch, not a single sample.
From Prototype to Production
A great prototype is a milestone, not the finish line. Once a design passes its form, fit, and function checks, you need parts that behave like the real thing at real volume, and that means moving toward production tooling. The jump from a printed or machined prototype to a hard steel mold is large in both cost and time, so most programs step through it deliberately rather than all at once.
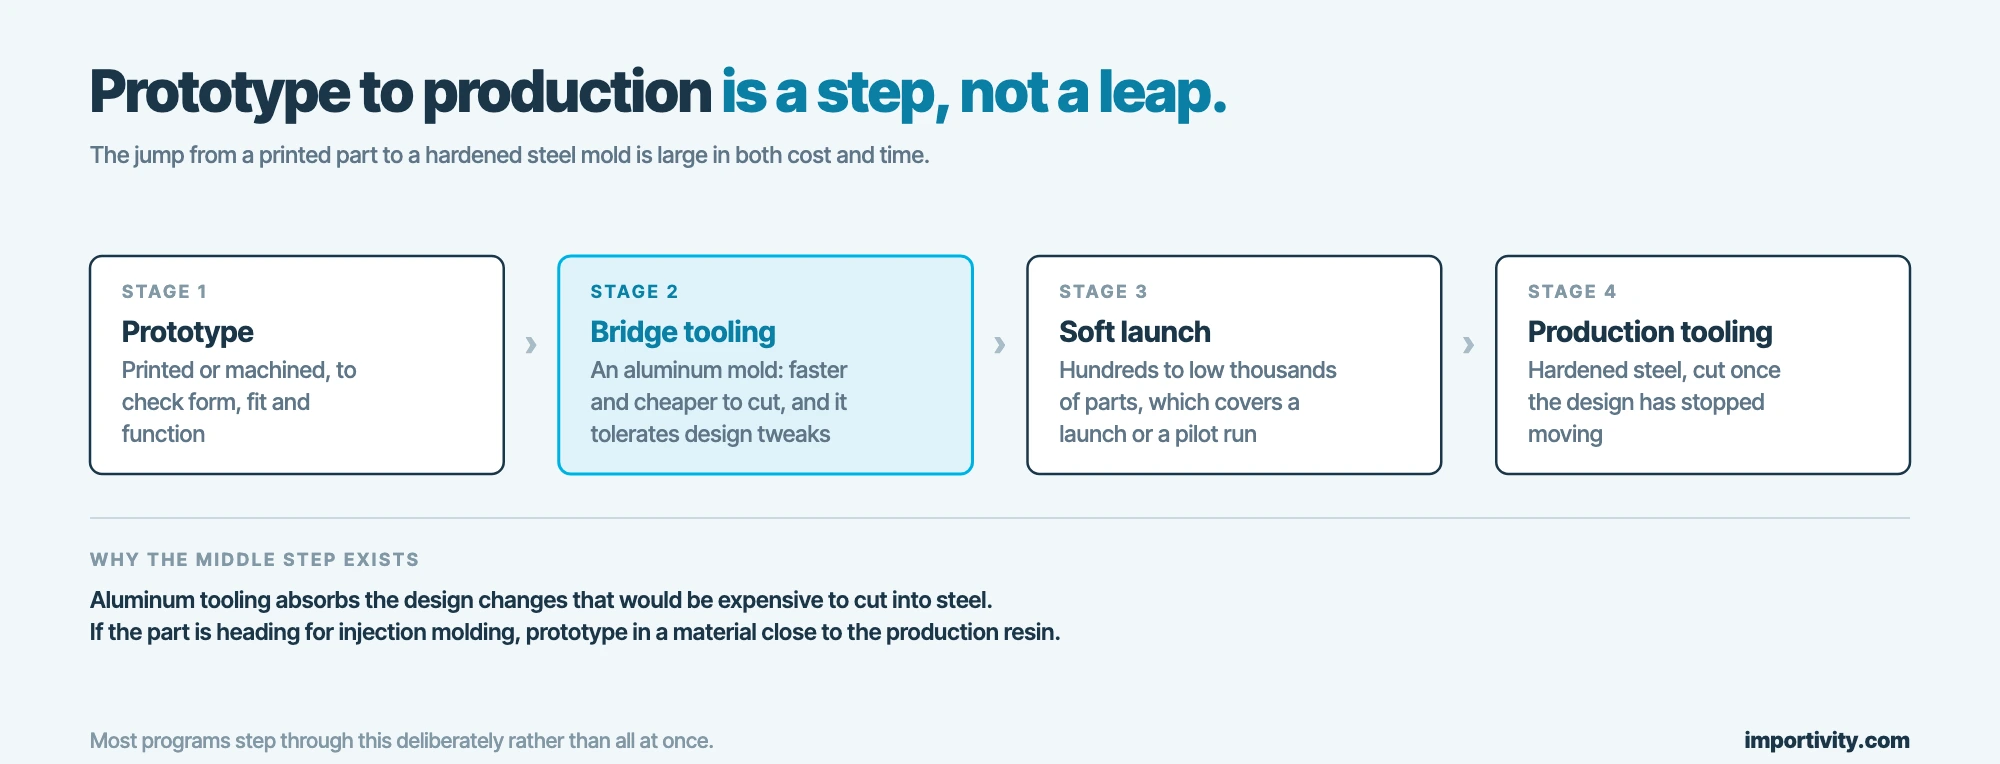
The classic in between move is bridge tooling. Instead of cutting an expensive hardened steel mold on day one, you cut an aluminum mold. Aluminum tooling is faster and cheaper to produce, tolerates design tweaks better, and can produce hundreds to low thousands of parts. That output covers a soft launch, a first sales channel, or early field testing while you finalize the design and validate demand. When volume and the design are both locked, you graduate to full steel injection molding for long production runs at the lowest per unit cost.
Not every part goes to molding. High value metal components, low volume assemblies, and parts that need certified material properties often stay on CNC into production, because machining already delivers true production materials and finishes. Before you cross this bridge, tighten your documentation. Lock the bill of materials, confirm tolerances, and order a proper pre production sample so the first tooled parts match what you approved. Skipping that step is the fastest way to cut a mold around a design that still had a flaw in it.
How to Choose a Method for Your Part
The right method comes down to what question you are trying to answer, how the part will be used, and how many you need. Run your part through the checklist below before you order anything, and the choice usually makes itself.
- Purpose: a rough shape check for the team points to FDM, while a customer facing show model points to SLA.
- Function: if the part must survive real handling, drops, or heat, choose SLS or CNC over a brittle concept print.
- Material truth: if you need actual production material properties, such as a specific metal or engineering plastic, go straight to CNC.
- Detail and finish: fine features, thin walls, and smooth cosmetic surfaces favor SLA resin.
- Geometry: complex internal shapes and lattices that would be hard to support favor SLS, which needs no support structures.
- Quantity: one to a few parts suit printing or machining, while 10 to 50 near production units point to urethane casting.
- Budget and speed: when the deadline is tomorrow and the budget is thin, FDM wins; when properties matter more than price, CNC wins.
- Next step: if this part is heading toward an injection molded product, prototype in a material close to the production resin so your tests translate.
When a part sits between two answers, the low risk move is to run a fast, cheap FDM version first to confirm the basic geometry, then commit to a more expensive SLA, SLS, or CNC part once the shape is right. If you would rather hand the whole loop to a partner, our team can select the method, manage the vendor, and carry the winning design into production through manufacturer sourcing.
For a worked example running from a drawing to a first article, see our 420seven prototyping case study, and Source With Jordan for the sourcing behind it.
Frequently Asked Questions
What is rapid prototyping used for?
Rapid prototyping is used to make physical parts fast from a CAD file so you can test form, fit, and function before committing to production tooling. Teams use it to check that parts assemble correctly, feel right in the hand, and survive real use, then revise the design across several quick build and test loops.
Which rapid prototyping method is cheapest?
FDM, or fused deposition modeling, is the cheapest and fastest method. It melts plastic filament layer by layer and produces usable concept parts for a few dollars to a few tens of dollars each. The trade off is rougher surfaces with visible layer lines, which is fine for internal checks but not for cosmetic show models.
How long does a rapid prototype take?
It depends on the method. 3D printed parts, including FDM, SLA, and SLS, often ship in one to three days. CNC machined parts usually take three to seven days. Urethane cast parts take one to two weeks because a master pattern and a silicone mold have to be built before parts are poured.
Can rapid prototyping use real production materials?
Yes. CNC machining cuts real production materials, including metals such as aluminum and steel and engineering plastics, so it delivers the truest material properties. Urethane casting also produces parts in materials that feel close to the final product. When accurate material behavior matters, CNC is usually the best choice.
When should I move from prototyping to production tooling?
Move to production tooling once the design is locked and volume justifies the cost. A common middle step is bridge tooling in aluminum, which is faster and cheaper than a hardened steel mold and can produce hundreds to low thousands of parts. Once the design and demand are proven, graduate to full steel injection molding for long runs.
About the author
Jordan Lewis
Chief Operating Officer, Importivity
Runs Importivity's sourcing operations across China, Vietnam, Mexico and India, from supplier negotiation through landed delivery.
Press and media inquiries: press@importivity.com